


Already in 2020, the OpenBSD team released OpenSSH 8.2 which supports FIDO (Fast Identity Online) U2F security keys. YubiKeys are hardware security keys that provide One Time Pads (OTP), namely U2F (Universal 2nd Factor) cryptographic tokens through a USB and/or NFC interface. This means you have to explicitly authorize a new SSH session by tapping the YubiKey. The private SSH key, which is normally on your SSD or cloud instance, should be useless to a malicious user who does not have access to the physical YubiKey on which the second private key is stored.
Configuring 2FA (Two Factor Authentication) with YubiKeys on SSH sessions is ideal for bastion hosts, also known as stepping stone servers that connect to your VPC (Virtual Private Cloud). This setup is shown in diagram 1:
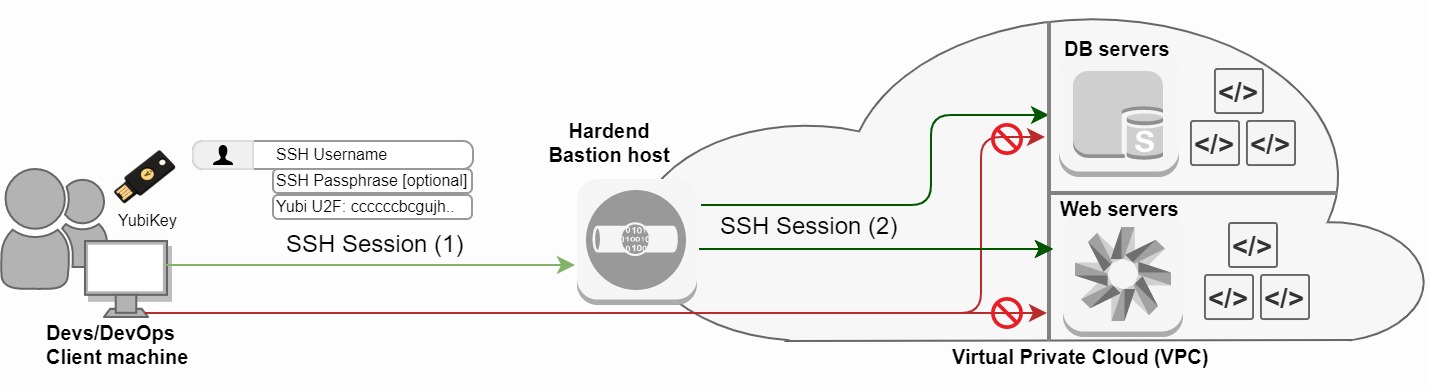
Diagram 1: Bastion host with OpenSSH YubiKey U2F Authentication
New SSH key-pair
Let's jump right in. First we need to make sure the client has OpenSSH 8.2 or higher installed. (Updated 2022): We will use Ubuntuu 22.04 as our client machine and OpenBSD 8.9 as our Bastion server for this tutorial:
$ lsb_release -d && ssh -V

Description:    Ubuntu 22.04.1 LTS
OpenSSH_8.9p1 Ubuntu-3, OpenSSL 3.0.2 15
Next we have to create a new SSH key-pair which can be either an ecdsa-sk or an ed25519-sk key-pair. The sk extension stands for security key. Note that an ed25519-sk key-pair is only supported by new YubiKeys with firmware 5.2.3 or higher which supports FIDO2. This means YubiKeys with firmware below 5.2.3 are only compatible with ecdsa-sk key-pairs. If possible, generate an ed25519-sk SSH key-pair for this reason.
We can check the firmware version of a YubiKey with the following command. Yubico does not permit its firmware to be altered in order to minimize the physical attack surface.
$ lsusb -v 2>/dev/null | grep -A2 Yubico | grep "bcdDevice" | awk '{print $2}'

4.37
Make sure to check out SoloKeys if you did not yet purchase your YubiKey(s). SoloKeys are based on open-source hardware and firmware while YubiKey's are closed source.
Next we create a new SSH-keypair generated on the Ubuntu 18.04 client host. The Yubico libsk-libfido2.so middleware library must be present on the host.
$ ssh-keygen -t ecdsa-sk -C "$(hostname)-$(date +'%d-%m-%Y')-physical_yubikey_number"

Generating public/private ecdsa-sk key pair.
You may need to touch your authenticator to authorize key generation.
Enter file in which to save the key (/home/$USER/.ssh/id_ecdsa_sk):
Enter passphrase (empty for no passphrase):
Enter same passphrase again:
Your identification has been saved in /home/$USER/.ssh/id_ecdsa_sk
Your public key has been saved in /home/$USER/.ssh/id_ecdsa_sk.pub
The key fingerprint is:
SHA256:esvq6KPZ5FGttkaYUUeUcf/Oo0hhsRAaB6NKN48kkeo ubuntu-17-02-2024-4432343
The key's randomart image is:
+-[ECDSA-SK 256]--+
|  ..  ++*o.      |
|  .. ..=oo .     |
| .o =.... . .    |
|.. =.+ . . o .   |
|. . .+o S +   .  |
| E  o..o . . o   |
|    o.+ . .   +  |
|   =.+.+ o . . . |
|  oo=++.o . .    |
+----[SHA256]-----+
Add your new SSH key-pair
Next we copy the public SSH key to the clipboard:
$ cat /home/$USER/.ssh/id_ecdsa_sk.pub

sk-ecdsa-sha2-nistp256@openssh.com AAAAInNrLWVjZHNhLXNoYTItbmlzdHAyNTZAb3BlbnNzaC5jb20AAAAIbmlzdHAyNTYAAABBBFfBajDaBdRiAgi1EVtHunUh9oAlf150n5vwtbjKvEfUGATM+IpMWrz5TEKKjsmMt29zlpJngcpSYs4gF2w9C2kAAAAEc3NoOg== ubuntu-17-02-2024-4432343
Add the id_ecdsa_sk.pub public key to the remote authorized_keys file located on the Bastion host you want to SSH to with U2F:
$ ssh USER@34.212.121.12 -p 22
$ ssh -V
OpenSSH_8.9p1 Ubuntu-3, OpenSSL 3.0.2
$ vi /home/$USER/.ssh/authorized_keys
[...]
sk-ecdsa-sha2-nistp256@openssh.com AAAAInNrLWVjZHNhLXNoYTItbmlzdHAyNTZAb3BlbnNzaC5jb20AAAAIbmlzdHAyNTYAAABBBFfBajDaBdRiAgi1EVtHunUh9oAlf150n5vwtbjKvEfUGATM+IpMWrz5TEKKjsmMt29zlpJngcpSYs4gF2w9C2kAAAAEc3NoOg== ubuntu-17-02-2024-4432343
[...]
The remote Bastion server has to support sk-based SSH key-pairs. We can even limit SSH authentication on the remote bastion server by only accepting U2F sessions:
$ vi /etc/ssh/sshd_config
[...]
PubkeyAcceptedKeyTypes sk-ecdsa-sha2-nistp256@openssh.com,sk-ssh-ed25519@openssh.com
[...]
Test your new SSH key-pair
Next we test this SSH key-pair from our Ubuntu bastion host to a remote OpenBSD 6.6 box:
$ ssh USER@34.212.121.12 -p 22

Confirm user presence for key ECDSA-SK SHA256:esvq6KPZ5FGttkaYUUeUcf/Oo0hhsRAaB6NKN48kkeo
[Tab your YubiKey U2F Security Key now]
Last login: Mon Feb 17 16:54:14 2024 from 23.23.23.23
OpenBSD 6.6 (GENERIC) #487: Tue Dec  3 18:54:03 MST

Welcome to OpenBSD: The proactively secure Unix-like operating system.

cryptsus-web01$
Excellent. We now have YubiKey sk-based authentication on our SSH connection. Read more on the different SSH algorithms and how to secure your SSH servers and clients in my previous blog post.
Considerations
It is wise to always configure two physical YubiKeys in case one gets broken, lost and/or compromised. Therefore, simply generate two key-pairs and add them to the authorized_keys file on the servers you want to SSH to.
Furthermore, storing both parts of a key on a hardware security key increases the likelihood of an attacker being able to use a stolen token device. Do not place the private key on the YubiKey for this reason. If you do, set and/or change the PIN before creating any resident keys.
You can start using YubiKey SSH authentication right away if you do not want to wait for OpenSSH 8.2 or higher to become available in your favorite Linux distribution package repository. Instead, compile OpenSSH 8.2p1 portable from source. Don't forget to install libfido2-dev and compile OpenSSH with the required --with-security-key-builtin flag:
$ sudo apt-get update && sudo apt-get upgrade -y
$ sudo apt-get install gcc libssl-dev libcbor-dev zlib* make

$ sudo apt-add-repository ppa:yubico/stable
$ sudo apt-get update -y
$ sudo apt-get install libfido2-dev

$ cd /usr/local/src
$ wget https://cdn.openbsd.org/pub/OpenBSD/OpenSSH/portable/openssh-8.2p1.tar.gz
$ tar -zxvf openssh-8.2p1.tar.gz
$ cd /usr/local/src/openssh-8.2p1
$ ./configure --prefix=/usr --with-security-key-builtin
$ make && make install
